This post contains affiliate links. As an Amazon Associate I earn from qualifying purchases. Learn more.
Ever wonder how restaurant salads always seem to have those impossibly vibrant, perfectly crisp-tender green beans or broccoli florets? Or maybe you’ve tried to freeze homegrown veggies only to have them turn out sad and mushy when thawed? The secret, my friends, often lies in a simple, two-step technique called blanching and shocking. It sounds fancy, but it’s really just a quick dip in a hot tub followed by an icy plunge, and it’s a total game-changer for home cooks looking to elevate their vegetable game and streamline meal prep.
This method isn’t just about making your veggies look pretty (though they absolutely will!). It’s about locking in flavor, preserving nutrients, achieving that ideal al dente bite, and even making your freezer a more reliable storage solution for seasonal produce. If you’re ready to say goodbye to dull, overcooked, or limp vegetables, let’s dive in!
What Exactly Is Blanching and Shocking?
At its core, blanching is the process of briefly cooking food, typically vegetables, in boiling water. This quick burst of heat does a few important things: it brightens colors, sets flavors, and slightly softens the texture without fully cooking the item. But the job isn’t done there! Right after their hot water dip, the veggies get plunged into an ice bath – that’s the “shocking” part. This immediate chilling halts the cooking process, preventing them from becoming overcooked and mushy, and ensures they retain their vivid color and firm texture.
The Hot Tub Dip (Blanching)
Think of this as a quick spa treatment for your veggies! Here’s how to do it:
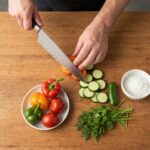
Prep Your Veggies: Wash and trim your vegetables. Cut them into uniform pieces so they cook evenly.
Boil Water: Grab a large pot (the bigger, the better, to maintain water temperature) and fill it with plenty of water. Bring it to a rolling boil. Don’t skimp on the water! You want at least three to four times as much water as vegetables.
Season the Water: Add a generous amount of salt to the boiling water, just like you would for pasta. This isn’t just for flavor; it also helps maintain the vegetables’ vibrant color.
Add Veggies: Carefully add your prepared vegetables to the boiling water. Do not overcrowd the pot! If you have a lot of veggies, work in batches to keep the water from dropping too far below boiling.
Cook Briefly: Blanching times are short, typically 30 seconds to 3 minutes, depending on the vegetable and its size. You’re aiming for bright color and a tender-crisp texture.
The Ice Bath Plunge (Shocking)
This is where the magic really happens, locking in all that goodness!
Prepare the Ice Bath: While your water is boiling, fill a large bowl with ice and cold water. This needs to be ready to go the second your veggies come out of the hot water.
Transfer Quickly: Using a slotted spoon or a handy (paid link) spider strainer (seriously, they make this so easy!), swiftly transfer the blanched vegetables from the boiling water directly into the ice bath.
Chill Thoroughly: Let the vegetables sit in the ice water until they are completely chilled through, usually for about the same amount of time they blanched. This stops the cooking process dead in its tracks.
Drain and Dry: Once chilled, drain the vegetables thoroughly. For best results, especially if you plan to freeze them or sauté them later, spread them out on a clean kitchen towel or paper towels to air dry, or gently pat them dry. Excess moisture can lead to ice crystals in the freezer or a steaming, rather than searing, effect in a pan.
Why Bother? The Fantastic Benefits of Blanching and Shocking
Beyond just looking good, this technique offers a host of practical advantages:
Vibrant, Eye-Catching Color: It’s like turning up the saturation on your vegetables! The heat brightens their natural pigments, especially greens, and the shock locks it in.
Perfect Tender-Crisp Texture: No more mushy broccoli! Blanching ensures your veggies are cooked just enough to be tender but still have a satisfying bite.
Halts Enzyme Action: This is key for freezing. Enzymes cause vegetables to lose flavor, color, and nutrients over time. Blanching inactivates these enzymes, making blanched veggies ideal for long-term freezer storage. Think spring peas or green beans you can enjoy all year!
Easy Peeling: While our focus is on green veggies, blanching is also the secret to easily peeling tomatoes, peaches, and almonds.
Reduced Cooking Time Later: Since your veggies are partially cooked, they’ll require less time in a stir-fry, casserole, or quick sauté, making weeknight meals even faster.
Best Veggies for Blanching & Shocking
This technique shines with sturdy, vibrant vegetables. Some of our favorites include:
Asparagus: A spring favorite! Blanch for 1-2 minutes.
Green Beans & Snap Peas: Crisp and sweet. Blanch for 2-3 minutes.
Broccoli & Cauliflower Florets: Perfect for salads, stir-fries, or just a quick side. Blanch for 2-3 minutes.
Spinach & Kale: Great for wilting quickly into dishes or adding to smoothies. Blanch for 30 seconds to 1 minute.
Brussels Sprouts: Halved or quartered, blanch for 3-4 minutes.
Carrots: Sliced or julienned, blanch for 2-3 minutes.
Common Mistakes to Avoid
Like any technique, there are a few pitfalls to sidestep to ensure success:
Not Enough Water or Salt: A small pot of water will drop in temperature too much when veggies are added, leading to prolonged cooking and dull colors. Always use a large volume of well-salted water.
Overcrowding the Pot: Again, this drops the water temperature too quickly. Work in batches to maintain that rolling boil.
Overcooking During Blanching: This is the most common mistake! Remember, it’s a *brief* cook. You’re not trying to make them fork-tender, just tender-crisp. Taste a piece to check.
Insufficient Ice Bath: If your ice bath isn’t cold enough or doesn’t have enough ice, it won’t effectively stop the cooking, and your veggies will continue to cook from residual heat.
Not Drying Thoroughly: Especially crucial if you’re freezing or planning to sauté or roast. Excess water will dilute flavors, prevent proper browning, or cause freezer burn.
Ready to Make Your Veggies Shine?
Blanching and shocking is one of those foundational kitchen techniques that, once mastered, opens up a world of possibilities. It’s a simple trick that makes a huge difference in the quality and presentation of your vegetable dishes, whether you’re prepping for a big Easter spread, grilling up some spring favorites, or just trying to get a head start on healthy weeknight dinners. Give it a try with your next batch of spring produce, and prepare to be amazed by how bright, crisp, and delicious your veggies can be!
I just finished Trevor Corson’s The Zen of Sushi and I left feeling very satisfied (instead of stuffed to the gills like I normally do after just eating sushi.) I found Corson’s narrative to be largely on point, inciteful, and generally entertaining. His style of intermixing dramatic narrative about the students of the California Sushi…
Okay, I’m back and it’s #meatlessmonday time! Yeah, I know it’s been a few weeks and I feel real bad about it, but I shall make it up to vegetarians everywhere I promise. But enough of that for now, on to Fried Egg Tostadas! I wanted to do something a bit fancier for tonight’s post. …
Discover a surprisingly satisfying vegetarian shepherd’s pie, packed with savory lentils and topped with a creamy root vegetable mash, perfect for Lenten meals or any night you crave comfort.
This vibrant Grilled Halloumi & Berry Salad combines salty grilled cheese with sweet summer berries and a tangy vinaigrette. It’s a low-carb, Type 2 diabetes-friendly meal perfect for a light summer dinner or Father’s Day celebration.
On Monday, I was invited to a United Way dinner at Benton’s Prime Steakhouse. I met some very nice people there who are doing some wonderful things to make the world a better place. This food blogger salutes all of you. The dinner was also the first time I have been back to Benton’s in, well,…
Unlock the magic of cast iron cooking by mastering the art of seasoning. This guide breaks down how to create and maintain a natural non-stick surface, turning your skillet into a cherished kitchen heirloom.